Tuesday, December 27, 2011

An Awesome (and Easy) Holiday Hors d'oeuvre

I made this for Christmas and might do again for New Year’s Eve.  Fortunately it’s two different groups of people!  Everyone loved the toasts, and it’s super easy!

I got this recipe from Splendid Table, which is a show on Public Radio.  They, in turn, excerpted it from Laura Werlin’s Cheese Essentials:  An Insider’s Guide to Buying and Serving Cheeses.  I’ve restructured it a little, showing which parts I did in advance to make it easy once guests arrived.

In my opinion (as someone who earned his living in the high-end food world for thirty years), this recipe is really brilliant.  It takes into consideration those classic qualities of Chardonnay (vanilla, butter, and “toast”) and enhances them to magnify the flavors even more.

Brie Toasts with Chardonnay-Soaked Golden Raisins

1-1/2 cups water
1 cup Chardonnay
¼ cup plus 2 tablespoons sugar
1 vanilla bean, split in half vertically (I have also done this with 1 t. pure vanilla extract)
1 c. golden raisins
12 oz. double-crème Brie
24 slices of baguette, ¼ inch thick
4 tablespoons melted butter

The day before serving:
In a medium saucepan, combine the water, wine, and sugar.  Bring to a simmer over medium-high heat until the sugar is dissolved.  Reduce the heat to medium and simmer for five minutes.  Turn off the heat.  Scrape the insides of the vanilla bean into the liquid, and add the remaining bean (or add the extract).  Add the raisins, allow them to steep for 1 hour uncovered at room temperature, then cover and refrigerate.  (This mixture will hold for up to two weeks, refrigerated).

A few hours before guests arrive:
Drain the raisins, reserving the liquid.  Remove and discard the vanilla bean.  Put the liquid back on the stove and bring to a boil.  Reduce to a simmer, and allow to reduce to 1/3 cup, about 10 to 15 minutes.  Once it begins to turn a golden brown, remove from the heat so it doesn’t burn.  It will thicken as it cools, and have a texture like maple syrup.

Preheat the oven to 400 degrees.  Brush each side of the baguette slices with melted butter, and toast in the oven about 10 minutes, until golden brown.  Allow to cool to room temperature.
 
Slice the cheese while it is still cold into 24 pieces.  (I spread them out on a cold plate and put back in the refrigerator (covered), since Brie can be a nightmare to work with when it’s warm.)

A little while before guests arrive:
Put a slice of cheese on each toast.  Spoon a few raisins over the cheese, and drizzle the syrup over the top.   (This is where the original recipe ends, serving the toasts at room temperature.  I put them back in the oven for about 10 minutes, and it was INCREDIBLE!)


Wednesday, December 21, 2011

The Visit to Vizcaya

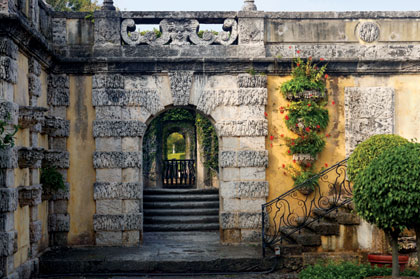
A few weeks ago we were lucky enough to visit Vizcaya, which is an extraordinary property in the Coconut Grove section of Miami.  Built in 1916 for James Deering (of International Harvester), it is really beyond description, and definitely worth visiting.
Most of these photos came from the Vizcaya website (my photos from that day were just not good), and even these don’t do justice to how beautiful this place is. 
What makes Vizcaya special (in my humble opinion) is that, unlike lots of the grand house museums from the turn of the last century, the designers of Vizcaya paid as much attention to the gardens as they did to the house. 
When we were in England last year, one of the gardens we visited was Hestercombe, where there are still large elements that exist as they were designed by Jekyll and Lutyens.  In those gardens, there is a definite calming feeling that comes as a result of brilliantly designed spaces; strolling the gardens at Vizcaya gave me that same restful feeling, while astounding me with the sheer size and brilliant design. 
This is definitely a garden to visit if you find yourself in South Florida! 

Tuesday, December 20, 2011

Just Getting This Recipe In Under the Wire for Christmas!

Double Decker Sweet Potato Pecan Pie

I haven't made this one yet.  In fact, it arrived with a Christmas card from Project Open Hand just today, and sounds amazing.  It's on my list of things "to do" in the next few days.  In the meantime, if you're of the mindset to get in some more holiday baking, let me know how you fare with this!  It sounds to be as Southern as a recipe can get.

As always, click on the recipe to enlarge and/or print.  Bon Appetit, y'all!

Thanks to All for Your Concern!

Thanks for all of you who expressed concern that there was something wrong and that I had disappeared or fallen off the face of the Earth.  Nothing is wrong, I've just been a slacker when it comes to the blog.  I'm trying to be better as we enter the New Year.  I'll still never understand how it is that so many people are interested in my babbling, but it's definitely good for the ego!

On a similar note, my computer's security settings don't seem to be playing nicely with those at Google, so I'm often not able to post on the blogs of others.  Please know that I love reading them, and would love to let you know that, but the great Google in the sky seems to prefer otherwise!

Saturday, December 17, 2011

Wednesday, August 17, 2011

It's Put Up or Shut Up Season

This is the time of year when the summer containers typically are looking their best.  In the heat of the South, some things are stressed, but in the northern states, the containers should really be at their best.  It's the time of year when it's time for containers to either produce or get stuck behind the garage until it's time for autumn planting.

Here are a few containers that have done well this summer, with some "notes from the gardener".

In the breezeway, we used the darkest-leafed cannas we could find for structure.  "Missus" isn't a big fan of red flowers, so we have cut most of the blooms off as they come up.  Kimberly Queen Fern is also a favorite plant for shade containers.  It goes forever in the summer heat and humidity, overwinters beautifully if you are so inclined, and is very inexpensive in most cases.  (I buy the giant hanging ones that are a "loss leader" at one of the big box stores every spring, and cut each hanging plant in four pieces to use in containers---this container here is using one quarter of one hanging basket that we bought for $9.99)
The front entrance pots are doing really well this season, with a "Fox Tail Palm" in the middle, with the elephant ear "Elena" that was mentioned in the previous post.   
The containers in the gazebo are virtually all shade, and a great place to utilize house plants during the summer.   
Ginger is a container standby for us, and this one has a great peach bloom that will start soon.  Ruellia also performs really well for us in containers, as do hibiscus.  We have a really difficult time overwintering tropical hibiscus in the greenhouse (scale magnets!).  This one is cold hardy, so we'll see what happens. Oleander really pops in late summer, and this year we've used a good amount of "bat face" cuphea, which has just exploded with color all summer!
This container grouping repeats lots of the same plants that are on the other side of the pool (above), and tends to get only morning sun.  For many of the filler plants (coleus, etc.), we pointedly buy full flats of 4 inch pots, and then split them up between the different containers for consistency throughout the property. 
This semi-shaded pot also is using canna for structure this season, which I'm really happy with.
Hot, hot hot!  These terra cotta pots bake in the sun for at least 8 hours every day, and are still blooming like mad!  Angelonia, convulvulus, and callibrachoa all seem to be loving life! 

A tip that I learned from Rita Randolph (the container queen) involves topdressing.  Once the container is completely pot-bound (not before), topdress the container with a couple of inches of play sand.  That very fine sand from Home Depot or Lowe's that one uses in kids' sandboxes, or to underlay pavers.  When watering, that sand will hold water like nobody's business, and will bring you another few weeks of great looking containers.  A bit messy to disassemble at the end of the season, but it's worth the extra step!


Sunday, August 14, 2011

August Garden Photos

The Chinese Snowball Viburnum (Viburnum macrocephalem) doesn't seem to know that it is a spring bloomer, and seems to produce a new giant flower head every day.
Confederate Rose (Hibiscus mutabilis) dies back to the ground every year, and then grows at a maniacal rate to reach at least 8 feet, and will soon be covered with frilly pink and white blooms.  It's one of those old-fashioned plants that you'll see driving through the countryside near old home sites. 
Aren't figs just the most seductive of fruits?  I really believe it was a fig that Adam and Eve couldn't resist..... look at that nectar just dripping out of the fruit!
One can barely see the front entrance of the Big House through the Limelight Hydrangeas and Begonias!  (For those who are interested, this is "Babywing," which puts up with crazy hot Western sun, and the foliage doesn't go red.)  The Elephant Ear in the containers took off this year (after two years of being really whimpy).  It is Colocasia esculenta "Elena," and Tony Avent says it's winter hardy as far north as Zone 7B.  I'm going to plant one in the ground at the end of the season, and will let you know in the spring. 
Begonia grandis "Heron's Pirouette" is a real winner in the shade garden.  In it's first year, six plants are now covering an area 4 feet by 6 feet.

The koi ponds look especially good once the tropical foliage plants start to fill in around them.